This activity is taken from the paper of A. Araullo, Dr. Soriano and Dr. Saloma on gait-analysis as a possible biometric authentication [1].
-----------------------------------------------------------------
This activity can be summarized into four steps:1. Capture an object against a plain background
2. Get the edge of the object and its (x,y) coordnates and convert it to a Freeman vector chain code.
3. Take the information on the curvature of the result in 2 by getting the difference between the current and previous pixel and performing a running sum.
4. Finally, the result in 3 is superimposed to the (x,y) coordinates of the edge detected in two showing chains of zeros as region of straight lines, negarics as region of concavities and positives as regions of convexities.
Writing blogs reports for my activities stresses me because of its technicalities that are not of my field (and that are very new to me), so please allow me to make this a little more fun by playing around with the titles. (wink(*-^))
________________________________________________________________________________________
I. Nakatatak sa isang litrato.
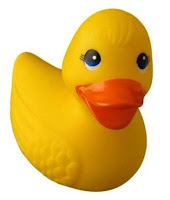
For my object, I used a picture of a toy duck that I took from the internet [2].
II. I-Follow ang edgy life. (I think physicists live a lives that're always at the edge.)
The edge of the object is extracted using the built-in tool for edge detection in Scilab. I encountered a problem in this early part of the activity for the edges of the eyes of this duck was also detected. I had to detect edges of small size by using find command and merge it with the background.
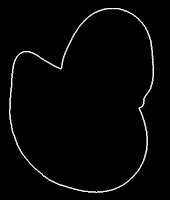
Then I used follow command to store the (x,y) coordinates of its edge into an array the way it follows the countour. Plotting the coordinates given by the follow command gave me this binary image.
In this part, I encountered another problem again. Since the edge detected in the previous step was not one pixel-thick, the follow command followed too many points. At first I was confident with the output of edge detection in scilab so I didn't think of verifying the output if it's just one-pixel thick. Unfortunately I was wrong. So I had to use thin to reduce this to size of 1 pixel. I found however that the equivalent thin command in Matlab is better (with the help of Kaye commenting on this plot.) So Kaye 'thinned' this plot for me in Matlab because I didn't have my own Matlab at that time (this was the time I was still sticking with memory-efficient (?) Scilab).
Then I had to encode my Freeman vector code. It took me a while (hours and I think days) to think about this Freeman code. The concept is okay but as for me, my creativity was in a vacation (I was too pre-occupied with teaching stuffs and my own research experiments at the lab) that I couldn't even imagine (or I didn't want to imagine) how to program this. Until the time that it dawned on me to finish this activity for I was already getting stuck in this for about about a week since I started it. And so I encoded it.
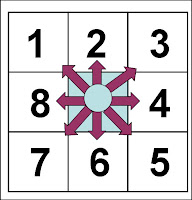
So here is how the Freeman vector code works. I started with the first element of my array of the edge coordinates. This is in a sense the same with follow command but instead of returning the coordinates, we assigned an integer from [1,8] indicating the direction of the next pixel based on its position measured with respect to the current-pixel location, as shown in Figure 3. For example, the next pixel is to the upper right corner of the current pixel then we label the next pixel with number 3.
 Figure 3. Freeman vector code. The next pixel is labeled [1,8] based
on the orientation with respect to the current pixel position.
III. Geeky mode
With successful conversion to a freeman code, we are now ready to get the difference between two successive pixel values and store it to a new array. Then from this array, we get the running sum of three pixels and put it into a new array, as shown in the figure below.
 Figure 4. From the Freeman vector chain code, the difference between two consecutive
numbers is calculated. After which, a running sum of three elements is done
resulting to a one-dimesional array of zeroes, positives and negarics.
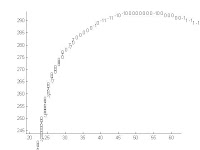
Finally (whew!). The last part is now to overlay the result in the running sum into the coordinates of the edges calculated earlier with the follow command. At this moment, Scilab has no built-in function to do that so I had to switch to Matlab, else it'll take more time (again!). We expect a plot of the contour of the image used but instead of plot of points, its a plot of numbers where zeroes indicate regions of straight lines, negarics as regions of concavities and positives as regions of convexities. This is easy with the built-in function text(x,y,'a') in Matlab. Here is what I got with the pretty toy-duck picture.
 Figure 5. The result of running sum superimposed with the edge coordinates.
 Figure 6. Zooming in at the duck's tail in Figure 5.
This is the last goal for this activity, which I achieved after more than two weeks considering the delays it took me to debug my program. For this activity I give myself a grade of 10.
Thanks to those who shared with me some academic noise that served as catalyst of this activity.
References:
1. A. Araullo, M. Soriano, C. Saloma. Curve Spreads - a biometric from front-view gait video. Pattern Recognition Letters 25(2004) 1595-1602.
2. https://www.ftcmain.co.uk/live/pages/images/duck.jpg


No comments:
Post a Comment